That one Fourth of July when I found myself scrambling for a last-minute party snack still sticks with me. The grill was running late, the store was closing, and everyone was already gathering in the backyard, hungry and impatient. Honestly, I was this close to handing out plain crackers when a quick idea sparked — what if I could whip up something festive, fun, and tasty in under 15 minutes? The perfect Liberty Bell cheese ball was born from pure necessity and a pinch of stubbornness.
I had some cream cheese, cheddar, and a few spices at hand, and I figured, why not shape it like the Liberty Bell for a little patriotic flair? The cracked surface effect was easy to mimic with a sprinkle of paprika and a bit of rough shaping. What surprised me most was how this simple, unplanned cheese ball stole the show and became the centerpiece of the snack table. Folks kept coming back for more, pairing it with crackers and chatting about the clever shape. Since then, I’ve made this recipe countless times — it’s my go-to for celebrations, casual get-togethers, or when I just want a no-fuss yet impressive appetizer.
There’s something comforting in that creamy, tangy cheese paired with crunchy crackers, but with a nostalgic twist that makes it feel special. This Liberty Bell cheese ball recipe isn’t about fancy techniques or exotic ingredients; it’s about a little creativity and the joy of sharing simple food with friends. I’m sharing it here because it’s stuck with me — the kind of dish that’s easy to make, easy to love, and always sparks a smile.
Why You’ll Love This Recipe
After trying and tweaking this recipe several times, I can confidently say the Perfect Liberty Bell Cheese Ball with Crackers is a celebration staple you’ll want on repeat. Here’s why:
- Quick & Easy: Ready in under 15 minutes — perfect for those surprise parties or last-minute gatherings when you need something fast but impressive.
- Simple Ingredients: No fancy shopping trips needed. Most are pantry staples like cream cheese, shredded cheddar, and a few spices.
- Perfect for Patriotic Celebrations: Whether it’s Independence Day, Memorial Day, or any festive occasion, the Liberty Bell shape adds a fun, thematic touch.
- Crowd-Pleaser: This cheese ball consistently gets rave reviews from kids and adults alike — it’s creamy, cheesy, and just the right amount of tangy.
- Unbelievably Delicious: The texture hits that perfect balance between fluffy and firm, and the smoky paprika topping adds a subtle warmth that sets it apart.
What makes this recipe truly different is the little details — like shaping the cheese into a Liberty Bell form and adding a cracked paprika finish that looks rustic but intentional. It’s not just another cheese ball; it’s a conversation starter and a nostalgic nod to classic celebrations. Honestly, it’s the kind of snack that makes you pause, close your eyes after the first bite, and just smile. Plus, pairing it with simple crackers turns it into a satisfying, shareable bite that keeps everyone coming back for more.
What Ingredients You Will Need
This recipe uses simple, wholesome ingredients to deliver bold flavor and satisfying texture without the fuss. Most of these are pantry staples, and substitutions are easy if you’re catering to dietary needs.
- Cream cheese, softened (I like using Philadelphia for creaminess)
- Sharp cheddar cheese, shredded (freshly shredded melts better than pre-shredded)
- Parmesan cheese, finely grated (adds a salty, nutty touch)
- Garlic powder (for subtle savory depth)
- Onion powder (boosts flavor without overpowering)
- Smoked paprika (for that smoky crackle finish on the outside)
- Worcestershire sauce (adds umami complexity)
- Fresh parsley, finely chopped (for a little freshness inside and garnish)
- Crackers — choose your favorite sturdy variety like buttery Ritz or gluten-free options if needed
If you want to switch things up, you can swap sharp cheddar with Pepper Jack for some heat or add chopped nuts for texture. For a dairy-free version, try a cream cheese alternative and vegan cheddar shreds. In summer, fresh herbs like chives or dill can brighten the flavor profile nicely.
Equipment Needed
- Mixing bowl: A medium-size bowl for combining all the cheeses and spices. I prefer glass or stainless steel for easy cleanup.
- Hand mixer or sturdy spoon: To blend the cheeses smoothly. A hand mixer cuts down effort, but a strong wooden spoon works fine if you don’t have one.
- Plastic wrap or parchment paper: For shaping and chilling the cheese ball.
- Serving plate or board: To display the Liberty Bell cheese ball — a wooden cutting board adds rustic charm.
If you don’t have a hand mixer, no worries. I once mixed this by hand after a blender mishap, and it turned out just fine. For shaping, using plastic wrap helps you mold the cheese without it sticking to your hands. Budget-friendly tip: a simple butter knife or offset spatula can help smooth the edges.
Preparation Method
- Soften the cream cheese: Leave it out on the counter for about 30 minutes or microwave in 10-second bursts until just soft but not melted. This makes mixing easier and smoother.
- Combine the cheeses: In your mixing bowl, add the softened cream cheese, shredded cheddar, and Parmesan. Use a hand mixer on low speed to combine until creamy and consistent, about 2-3 minutes. If mixing by hand, expect a little more elbow grease but it’s doable.
- Add seasonings: Sprinkle in garlic powder, onion powder, and Worcestershire sauce. Mix again until everything is evenly distributed. The Worcestershire adds a subtle umami punch that really lifts the flavor.
- Fold in parsley: Stir in the chopped fresh parsley with a spoon. This adds a fresh green bite and a pop of color inside the cheese ball.
- Shape the cheese ball: Lay out a large piece of plastic wrap. Spoon the mixture onto it and gather the edges of the wrap to form a rough bell shape. Press and mold gently to create the iconic Liberty Bell silhouette — don’t worry about perfection, rough edges add character.
- Chill and set: Wrap it tightly and refrigerate for at least 1 hour to firm up. This helps the flavors meld and makes slicing easier.
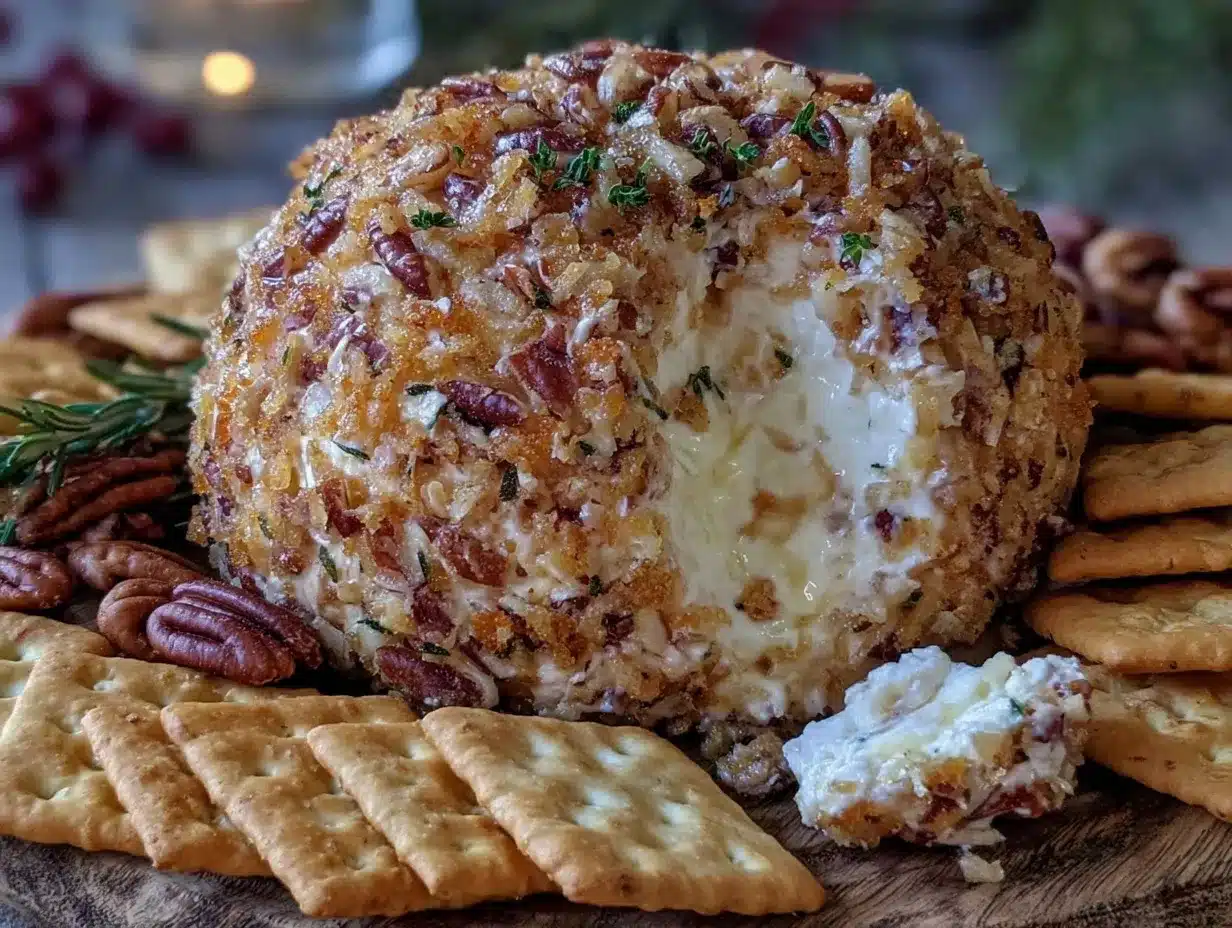
- Add the paprika “crack” finish: Once chilled, unwrap and place the cheese ball on your serving plate. Lightly dust the surface with smoked paprika, gently pressing in some areas to mimic the cracks on the Liberty Bell.
- Serve with crackers: Arrange crackers around the cheese ball for easy snacking. Depending on your crowd, you can add sliced veggies or breadsticks to complement.
If the cheese ball feels too soft to shape, pop it back in the fridge for 15-20 minutes and try again. The key is patience — a firmer cheese ball means cleaner slices and less mess.
Cooking Tips & Techniques
Cheese balls might seem straightforward, but a few tricks can make all the difference between a so-so snack and a standout hit. Here’s what I’ve learned:
- Use freshly shredded cheese whenever possible. Pre-shredded cheese has anti-caking agents that can affect texture and meltability in the mix.
- Don’t skip the chilling time. The cheese ball needs at least an hour to firm up — rushing this step leads to a messy, crumbly mess.
- Work quickly when shaping. The warmer the cheese gets, the softer and stickier it becomes, making it hard to hold the shape.
- Experiment with flavor balance. If you like a sharper tang, add a splash more Worcestershire or a pinch of cayenne for heat.
- Pair with sturdy crackers. Thin crackers tend to break under the creamy weight, so something with a bit of crunch and resilience works best.
One time, I tried blending the cheese in a food processor to save time, but it ended up too dense. Mixing by hand or with a hand mixer gives a lighter, more inviting texture. Also, don’t be shy with the paprika — it’s not just decoration; it adds a smoky warmth that really brings the cheese ball to life.
Variations & Adaptations
This Liberty Bell cheese ball is a great base for variations, whether you want to suit different diets or add seasonal flair.
- Spicy Kick: Add diced jalapeños or a dash of hot sauce to the mixture for heat lovers. Swap cheddar for Pepper Jack for an extra zing.
- Nutty Crunch: Fold in finely chopped pecans or walnuts for texture. You can also roll the finished cheese ball in crushed nuts instead of paprika.
- Herbaceous Fresh: Swap parsley for fresh dill, chives, or basil to match a summer picnic vibe.
- Dairy-Free Option: Use vegan cream cheese and plant-based cheddar shreds. Nutritional yeast can add cheesy flavor too.
- Smoked Cheese: Replace some cheddar with smoked gouda or smoked cheddar for a deeper flavor profile.
Personally, one summer I tried adding finely chopped sun-dried tomatoes and fresh basil — it was a hit at a backyard barbecue. For a gluten-free party, pairing this cheese ball with gluten-free cornbread muffins made for a hearty, crowd-pleasing combo.
Serving & Storage Suggestions
Serve the Liberty Bell cheese ball chilled or at room temperature for best flavor. I find it tastes best after sitting out for about 15 minutes to soften slightly, making spreading easier. Presentation-wise, a wooden board with an array of colorful crackers adds festive charm.
Complement the cheese ball with fresh veggies like celery sticks or bell pepper strips, or pair it with a crisp white wine or sparkling lemonade for an easy celebration snack. If you’re planning a full spread, this cheese ball goes great alongside smoky dishes like the smokeless BBQ chicken I’ve shared before.
Store leftovers wrapped tightly in plastic wrap or in an airtight container in the refrigerator for up to 5 days. To reheat, just let it sit at room temperature for 15-20 minutes. The flavors meld even better after a day or two, making it a fantastic make-ahead appetizer.
Nutritional Information & Benefits
This cheese ball offers a good source of protein and calcium thanks to the cream cheese and cheddar. It’s moderately rich, so small portions serve as a satisfying snack without overdoing it. Using sharp cheddar adds depth without needing extra salt, helping keep sodium in check.
For those watching carbs, this recipe is naturally low-carb, especially when enjoyed with low-carb crackers or fresh veggies. Be mindful of dairy allergies, but substitutions with plant-based cheeses can easily accommodate those needs. The fresh parsley adds a hint of vitamins and antioxidants, rounding out this indulgent yet approachable appetizer.
Conclusion
This Perfect Liberty Bell Cheese Ball with Crackers recipe has become my little secret weapon for celebrations — simple, quick, and guaranteed to get compliments. It’s the kind of snack that brings people together without fuss or fancy ingredients, just honest flavor and a bit of fun. I always encourage you to tweak it to your taste — maybe a touch more spice or an herb swap — because that’s what makes it truly yours.
Next time you need a festive appetizer that delivers on both looks and taste, give this cheese ball a shot. And if you love easy, crowd-pleasing recipes, you might enjoy my dairy-free star-spangled fruit pizza for a sweet twist on patriotic treats. Feel free to share your own adaptations or questions below — I love hearing how you make this recipe your own. Here’s to good food and great company!
FAQs
Can I make the Liberty Bell cheese ball ahead of time?
Absolutely! It tastes even better after resting overnight in the refrigerator. Just wrap it tightly to keep it fresh.
What’s the best way to shape the cheese ball if I don’t have plastic wrap?
You can lightly oil your hands or use parchment paper to help shape it. Alternatively, form it on a wax paper-lined plate.
Can I freeze this cheese ball?
Freezing isn’t recommended as it can affect texture and flavor. It’s best enjoyed fresh or refrigerated.
What crackers pair best with this cheese ball?
Sturdy crackers like buttery Ritz, multigrain crisps, or gluten-free options hold up well and complement the creamy texture.
Is there a way to make this cheese ball vegan?
Yes! Use vegan cream cheese and cheddar-style shreds, and add nutritional yeast for extra cheesy flavor.
Pin This Recipe!
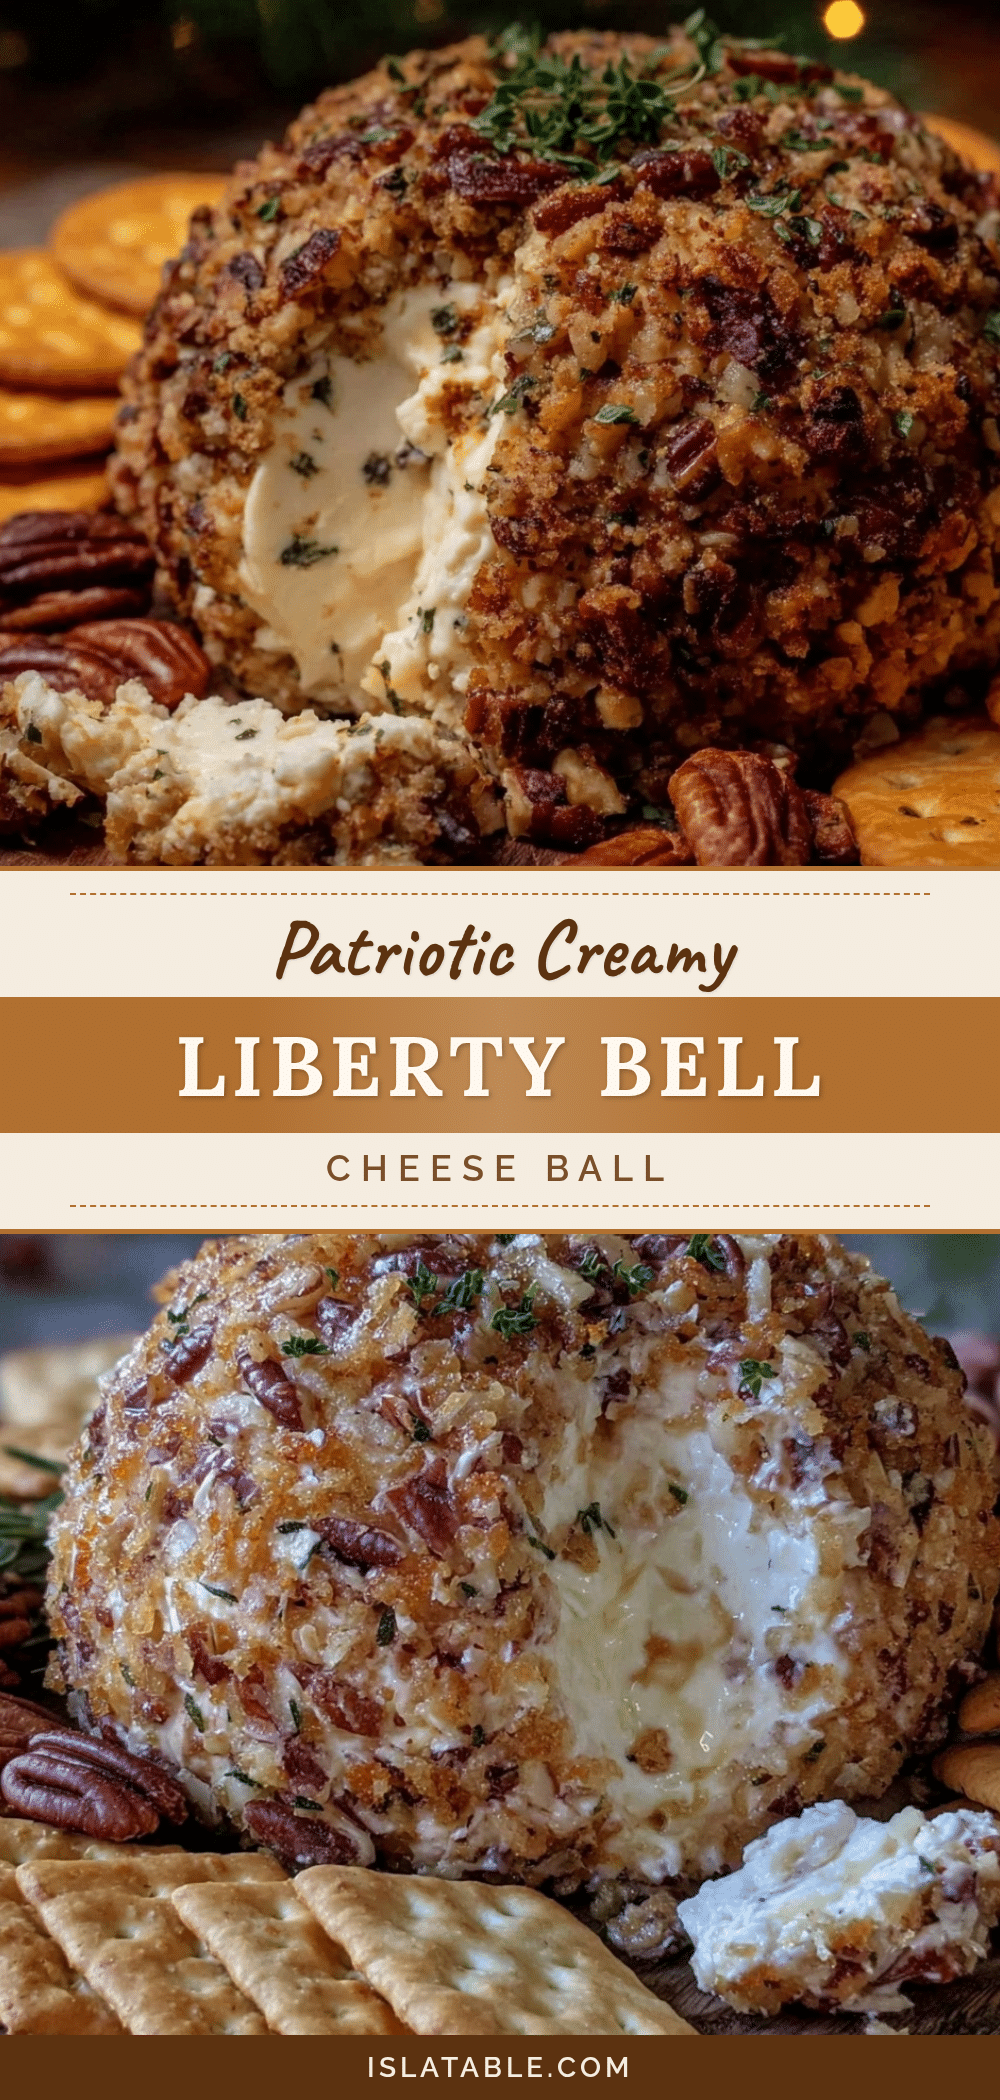
Perfect Liberty Bell Cheese Ball Recipe with Crackers for Easy Celebrations

A quick and easy cheese ball shaped like the Liberty Bell, perfect for patriotic celebrations and last-minute gatherings. Creamy, tangy, and smoky with a festive flair.
- Prep Time: 10 minutes
- Cook Time: 0 minutes
- Total Time: 1 hour 10 minutes
- Yield: 12 servings 1x
- Category: Appetizer
- Cuisine: American
Ingredients
- 8 oz cream cheese, softened
- 1 cup sharp cheddar cheese, shredded
- 1/4 cup Parmesan cheese, finely grated
- 1/2 teaspoon garlic powder
- 1/2 teaspoon onion powder
- 1 teaspoon Worcestershire sauce
- 2 tablespoons fresh parsley, finely chopped
- Smoked paprika for dusting
- Crackers for serving (e.g., buttery Ritz, multigrain crisps, or gluten-free options)
Instructions
- Soften the cream cheese by leaving it out at room temperature for about 30 minutes or microwaving in 10-second bursts until just soft but not melted.
- In a mixing bowl, combine the softened cream cheese, shredded cheddar, and Parmesan cheese. Use a hand mixer on low speed to blend until creamy and consistent, about 2-3 minutes. Mixing by hand is also possible but requires more effort.
- Add garlic powder, onion powder, and Worcestershire sauce to the cheese mixture. Mix until evenly distributed.
- Fold in the chopped fresh parsley with a spoon.
- Lay out a large piece of plastic wrap. Spoon the mixture onto it and gather the edges to form a rough Liberty Bell shape. Press and mold gently to create the silhouette.
- Wrap tightly and refrigerate for at least 1 hour to firm up and allow flavors to meld.
- Once chilled, unwrap and place the cheese ball on a serving plate. Lightly dust the surface with smoked paprika, pressing gently in some areas to mimic cracks on the Liberty Bell.
- Arrange crackers around the cheese ball and serve. Optionally, add sliced veggies or breadsticks to complement.
Notes
Use freshly shredded cheese for best texture. Chill the cheese ball for at least 1 hour to firm up and make shaping easier. Work quickly when shaping to prevent the cheese from becoming too soft. Pair with sturdy crackers to avoid breakage. The smoked paprika adds a smoky warmth and decorative cracked effect.
Nutrition
- Serving Size: Approximately 1 oz c
- Calories: 150
- Sugar: 1
- Sodium: 220
- Fat: 13
- Saturated Fat: 7
- Carbohydrates: 2
- Protein: 6
Keywords: Liberty Bell cheese ball, cheese ball recipe, Fourth of July appetizer, patriotic snack, easy cheese ball, party appetizer, cream cheese ball