“Pass me a bag!” That’s what I heard over and over at our last backyard gathering, where I tossed together these Easy Walking Taco Bar Bags. Honestly, I wasn’t expecting much — just wanted something quick and mess-free to feed a crowd while juggling the grill and the chaos of kids running around. But those simple little bags, packed with all the taco fixings, turned into the star of the party.
It started when my friend texted me mid-prep, “Are you sure those chips in bags will work for tacos?” Skeptical, I gave it a shot anyway. The crunch, the juicy seasoned beef, the fresh toppings stacked right there in the bag — it was pure magic. People loved the novelty, but more than that, they loved how easy it was to grab a snack without sticky plates or long waits.
That night stuck with me because it reminded me how sometimes the best recipes come from those “just wing it” moments — especially when feeding a crowd that’s hungry, distracted, and ready for something fun. This recipe for Easy Walking Taco Bar Bags fits perfectly into that vibe: casual, tasty, and fuss-free. It’s the kind of snack that makes you pause, smile, and realize sometimes simple wins the day.
Plus, there’s something about folding that chip bag just right, layering in seasoned meat, cheese, and a dash of salsa that feels just right for any party. So if you want to impress without the stress, these taco bar bags might just become your go-to, too.
Why You’ll Love This Recipe
After making these Easy Walking Taco Bar Bags countless times (yes, way more than once a week recently), I can say they really hit all the right notes for casual entertaining. Here’s why this recipe has earned a permanent spot in my party repertoire:
- Quick & Easy: All set in about 20 minutes — perfect for last-minute get-togethers or when you need to feed a bunch fast.
- Simple Ingredients: Nothing fancy or hard to find here. You probably have most of this in your pantry already.
- Perfect for Parties: Whether it’s game day, a casual backyard BBQ, or a birthday bash, walking tacos are always a hit.
- Crowd-Pleaser: Kids and adults alike love them — the handheld convenience appeals across the board.
- Unbelievably Delicious: The combo of crunchy chips, savory seasoned beef, melty cheese, and fresh toppings hits all the comfort food marks.
What makes these taco bar bags stand out? It’s the way the seasoned beef is cooked with just the right blend of spices — not too salty, with a little smoky depth — paired with fresh, vibrant toppings like crisp lettuce, diced tomatoes, and a sprinkle of cilantro. I sometimes sneak in a spoonful of creamy avocado or a squeeze of lime for that extra zing, which really takes it over the top.
Honestly, this isn’t just another taco recipe. It’s the kind of dish that makes you want to close your eyes and savor each bite. The no-fuss setup means you can focus on enjoying the party, not stressing in the kitchen. And if you love easy crowd-pleasers like flavorful indoor smokeless BBQ chicken or crave simple but satisfying sides like easy gluten-free cornbread muffins, this recipe will slide right into your menu.
What Ingredients You Will Need
This recipe uses simple, wholesome ingredients to deliver bold flavor and satisfying texture without the fuss. You can customize the toppings to your liking, but here’s my tried-and-true lineup to get you started:
- For the seasoned beef:
- 1 lb (450 g) ground beef (80/20 for best flavor and juiciness)
- 1 packet taco seasoning mix or 2 tbsp homemade taco spice blend (paprika, cumin, chili powder, garlic powder, onion powder, salt, pepper)
- 1/4 cup (60 ml) water
- 1 tbsp olive oil (for cooking)
- For the taco bar:
- Individual bags of crunchy tortilla chips (Fritos or similar corn chips work great)
- 1 cup (100 g) shredded cheddar cheese
- 1 cup (100 g) shredded lettuce (iceberg or romaine)
- 1 cup (150 g) diced tomatoes
- 1/2 cup (120 g) sour cream or Greek yogurt (for lighter option)
- 1/4 cup (15 g) chopped cilantro (optional but adds freshness)
- 1/2 cup (120 ml) salsa or pico de gallo
- 1 avocado, diced or sliced (optional creamy addition)
For the taco seasoning, I prefer using a homemade blend to control the salt and spice level, but store-bought packets work fine in a pinch. When selecting chips, I like Fritos because their sturdy texture holds up well when loaded; if you want a gluten-free option, check the label or use corn tortilla chips labeled gluten-free.
You can swap out the ground beef for ground turkey or plant-based crumbles if you want a different protein. For dairy-free versions, try coconut yogurt instead of sour cream and a vegan cheese alternative. In summer, fresh tomatoes and avocado from the farmers market really shine here.
Equipment Needed
- Large skillet or frying pan – I use a non-stick 12-inch skillet for even cooking and easy cleanup.
- Wooden spoon or spatula – perfect for breaking up the ground beef while cooking.
- Measuring spoons and cups – for precise seasoning and water measurements.
- Serving bowls or small containers – for setting up the taco bar toppings.
- Optional: small ladle or spoon for portioning the beef into chip bags.
If you don’t have a non-stick skillet, a well-seasoned cast iron pan works wonderfully, though it may need a bit more oil to prevent sticking. I’ve found that using disposable or reusable small bowls for toppings speeds up assembly and keeps the taco bar tidy. For budget-friendly options, you don’t need anything fancy here — just simple, easy-to-clean basics.
Preparation Method
- Cook the seasoned beef: Heat 1 tbsp olive oil in your skillet over medium-high heat. Once hot, add 1 lb (450 g) ground beef. Break it up with your spatula and let it brown for about 5-7 minutes, stirring occasionally until no pink remains.
- Add seasoning: Sprinkle the taco seasoning mix evenly over the beef. Pour in 1/4 cup (60 ml) water and stir to combine. Reduce heat to medium-low and simmer for about 5 minutes, stirring now and then until the mixture thickens slightly. The beef should smell fragrant and look nicely coated.
- Prepare toppings: While the beef simmers, shred your cheese, chop lettuce, tomatoes, cilantro, and dice avocado if using. Set sour cream and salsa in serving bowls for easy access.
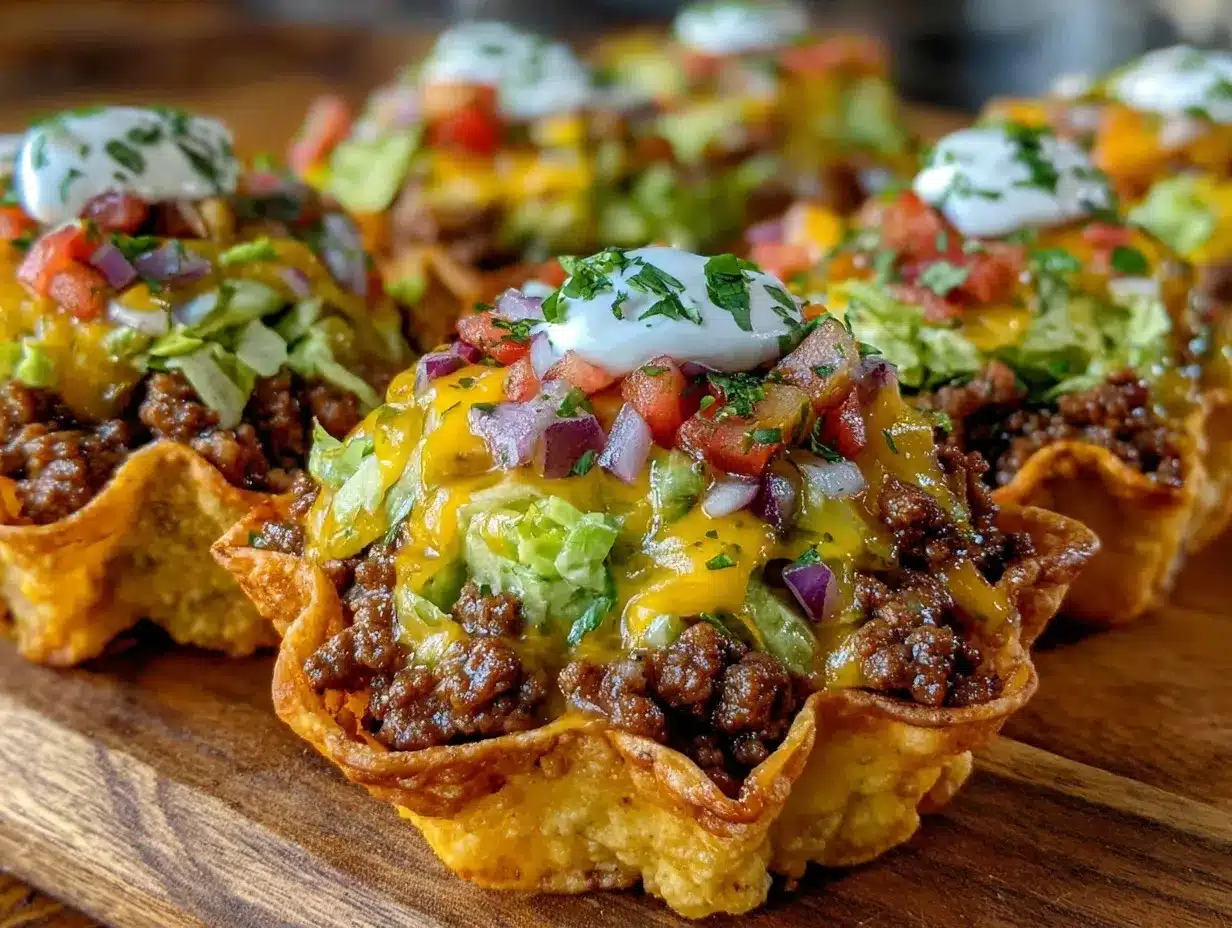
- Assemble the walking taco bags: Carefully open each bag of chips without tearing. Using a spoon or ladle, add a generous scoop of the seasoned beef right into the bag. Top with shredded cheese, lettuce, tomatoes, a dollop of sour cream, salsa, cilantro, and avocado.
- Serve immediately: Hand out the bags with forks or spoons tucked inside. The chips act as your edible scoop, so no plates needed!
Tip: If you’re making this ahead for a party, keep the seasoned beef warm in a covered dish and set up the toppings buffet style so guests can customize their own bags. Just add the chips and toppings right before serving to avoid sogginess.
Cooking Tips & Techniques
Getting the beef just right is key here. I’ve learned the hard way that cooking the meat on medium-high heat first to brown it well locks in the flavor and prevents that boiled texture you sometimes get when you add seasoning too early. Also, don’t skip the water when adding seasoning — it helps distribute the spices evenly and keeps everything juicy.
When assembling, resist the temptation to overload the bags. A good balance of chips to toppings keeps each bite satisfying without falling apart. If you want to prep toppings in advance, keep watery ingredients like tomatoes and salsa separate until serving to avoid soggy chips.
One trick I use is to gently crush the chips inside the bag before adding beef to create a perfect base that holds the fillings without big air pockets. Also, warm the beef just before serving if kept in the fridge — lukewarm meat doesn’t meld as nicely with the chips and toppings.
For multitasking during parties, I recommend setting up a taco bar station near the grill or main hangout spot. It keeps everyone engaged and lets you focus on other dishes, like maybe adding some healthy keto coleslaw or gluten-free cornbread muffins on the side.
Variations & Adaptations
You can easily switch up this recipe to suit different tastes and dietary needs:
- Vegetarian or Vegan: Swap ground beef with seasoned black beans or plant-based crumbles. Use dairy-free cheese and sour cream alternatives to keep it vegan-friendly.
- Spice it up: Add sliced jalapeños, hot sauce, or a sprinkle of cayenne to the beef for a fiery kick.
- Low-carb: Use pork rinds or baked cheese crisps instead of chips for a keto-friendly twist.
- Seafood taco bags: Replace beef with seasoned grilled shrimp or flaky fish for a lighter version.
- Seasonal toppings: In summer, add grilled corn kernels or fresh mango salsa. In fall, try roasted sweet potatoes and a drizzle of chipotle mayo.
I once made a version with smoky chipotle pulled pork instead of beef — it was a hit and paired perfectly with the crunchy chips and fresh toppings. Feel free to experiment with your favorite proteins or flavors.
Serving & Storage Suggestions
These walking taco bags are best served fresh and warm, straight from the skillet to the bag. Serve with extra salsa or hot sauce on the side for those who want to customize the heat. You can present them on a tray lined with festive napkins for easy grabbing.
If you have leftovers, store the cooked seasoned beef in an airtight container in the fridge for up to 3 days. Keep the chips and toppings separate to maintain crunch and freshness. When ready to eat, gently reheat the beef on the stove or microwave and assemble fresh bags.
Reheating tips: Warm the beef in a skillet over medium heat with a splash of water to keep it moist. Avoid microwaving chips as they get soggy quickly. For parties, set toppings chilled and serve alongside warm beef for best texture contrast.
Flavors tend to deepen after sitting in the fridge, especially the seasoned beef, so leftovers can taste even better the next day. Just remember to keep the crispy elements separate until serving.
Nutritional Information & Benefits
Each walking taco bag packs a satisfying mix of protein, fiber, and veggies, making it more balanced than your average snack. A typical serving contains approximately:
| Nutrient | Amount (per serving) |
|---|---|
| Calories | 350-400 kcal |
| Protein | 20-25 g |
| Carbohydrates | 25-30 g |
| Fat | 15-18 g |
| Fiber | 3-5 g |
Key ingredients like lean ground beef provide iron and zinc, important for energy and immune support. Fresh vegetables add vitamin C and antioxidants, while tortilla chips offer satisfying crunch and carbohydrates for quick energy.
For gluten-free eaters, choose certified gluten-free chips. Those watching carbs can swap chips for baked alternatives or enjoy the beef and toppings as a taco salad bowl. This recipe fits nicely into a balanced lifestyle when paired with nutrient-rich sides such as healthy keto coleslaw or fresh vegan Greek pasta salad.
Conclusion
Easy Walking Taco Bar Bags are the perfect blend of fun, flavor, and fuss-free party food. You don’t need to be a seasoned cook to pull this off — just a skillet, some pantry staples, and a few fresh toppings to make everyone happy. What I love most is how it brings people together, letting everyone customize their own snack while keeping the vibe casual and relaxed.
Feel free to tweak the toppings, proteins, and spice levels to your liking. Whether you’re hosting a big crowd or a small get-together, these walking tacos deliver big on taste without the cleanup hassle. If you try this recipe, I’d love to hear how you make it your own — drop a comment or share your favorite add-ins!
Here’s to easy entertaining and tasty bites that keep the party moving.
Frequently Asked Questions
Can I make walking taco bags ahead of time?
You can prepare the seasoned beef and toppings in advance, but assemble the taco bags just before serving to keep chips crunchy.
What type of chips work best for walking tacos?
Sturdy corn chips like Fritos or similar brands hold up well under the toppings without getting soggy too quickly.
How do I keep the taco bags from getting soggy?
Keep wet ingredients like salsa and tomatoes separate until serving and don’t overfill the bags. Adding sour cream or avocado last helps preserve crispness.
Can I use ground turkey instead of beef?
Absolutely! Ground turkey works well with the same seasoning and makes a leaner option for walking tacos.
Are these walking taco bags kid-friendly?
Definitely! They’re handheld, customizable, and mild enough for kids. You can adjust toppings to suit younger palates easily.
Pin This Recipe!
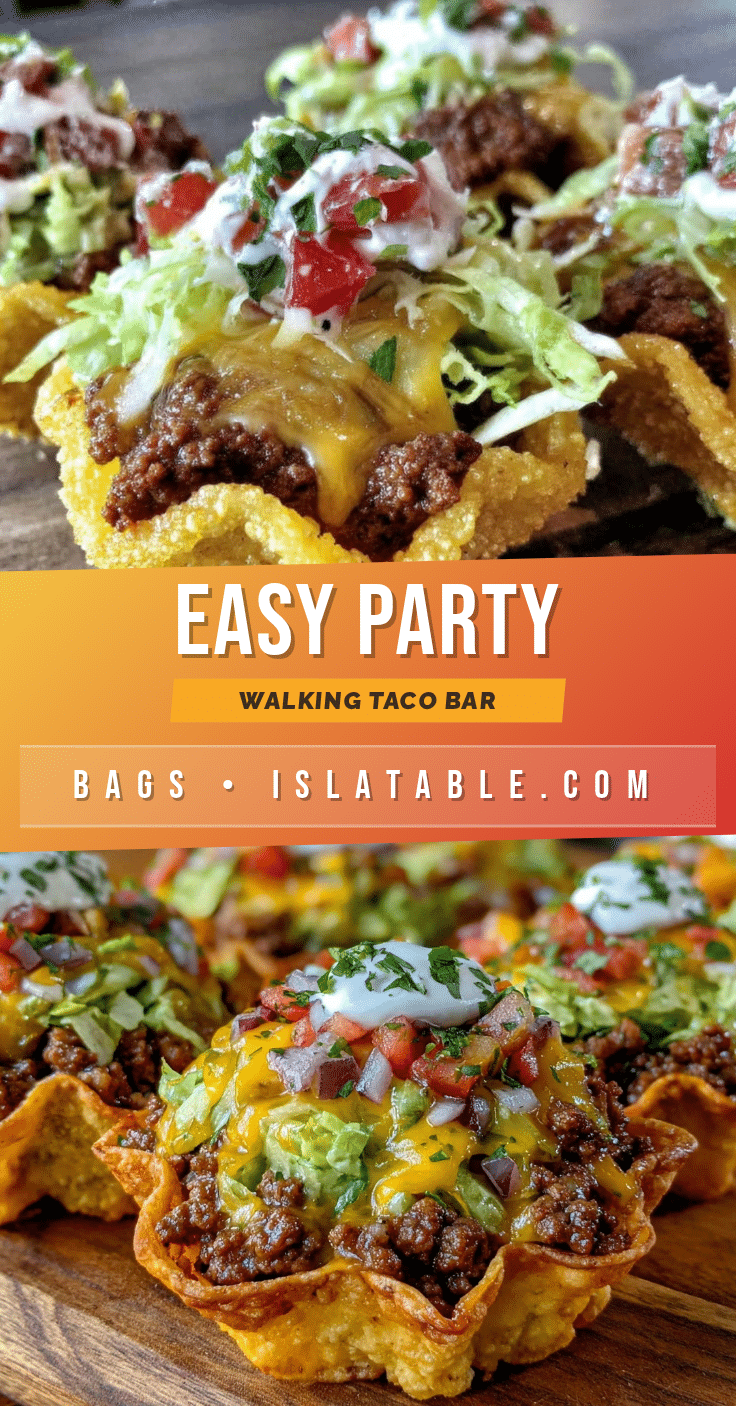
Easy Walking Taco Bar Bags Recipe for the Perfect Party Snack

A quick and mess-free walking taco recipe perfect for parties, featuring seasoned ground beef, crunchy chips, and fresh toppings served right in individual chip bags.
- Prep Time: 10 minutes
- Cook Time: 10 minutes
- Total Time: 20 minutes
- Yield: 8 servings 1x
- Category: Snack
- Cuisine: Mexican
Ingredients
- 1 lb ground beef (80/20 for best flavor and juiciness)
- 1 packet taco seasoning mix or 2 tbsp homemade taco spice blend (paprika, cumin, chili powder, garlic powder, onion powder, salt, pepper)
- 1/4 cup water
- 1 tbsp olive oil
- Individual bags of crunchy tortilla chips (Fritos or similar corn chips)
- 1 cup shredded cheddar cheese
- 1 cup shredded lettuce (iceberg or romaine)
- 1 cup diced tomatoes
- 1/2 cup sour cream or Greek yogurt
- 1/4 cup chopped cilantro (optional)
- 1/2 cup salsa or pico de gallo
- 1 avocado, diced or sliced (optional)
Instructions
- Heat 1 tbsp olive oil in a skillet over medium-high heat. Add 1 lb ground beef and break it up with a spatula. Brown for 5-7 minutes until no pink remains.
- Sprinkle taco seasoning mix evenly over the beef. Pour in 1/4 cup water and stir to combine. Reduce heat to medium-low and simmer for about 5 minutes, stirring occasionally until thickened.
- While beef simmers, prepare toppings: shred cheese, chop lettuce, tomatoes, cilantro, and dice avocado if using. Set sour cream and salsa in serving bowls.
- Carefully open each bag of chips without tearing. Add a generous scoop of seasoned beef into the bag. Top with shredded cheese, lettuce, tomatoes, sour cream, salsa, cilantro, and avocado.
- Serve immediately with forks or spoons tucked inside the bags.
Notes
Use sturdy corn chips like Fritos to prevent sogginess. Keep wet ingredients separate until serving to maintain chip crunch. Warm beef before serving if prepared ahead. Can substitute ground turkey or plant-based crumbles for different diets.
Nutrition
- Serving Size: 1 walking taco bag
- Calories: 375
- Sugar: 3
- Sodium: 600
- Fat: 16.5
- Saturated Fat: 6
- Carbohydrates: 27.5
- Fiber: 4
- Protein: 22.5
Keywords: walking tacos, taco bar, party snack, easy recipe, ground beef tacos, handheld tacos, quick party food