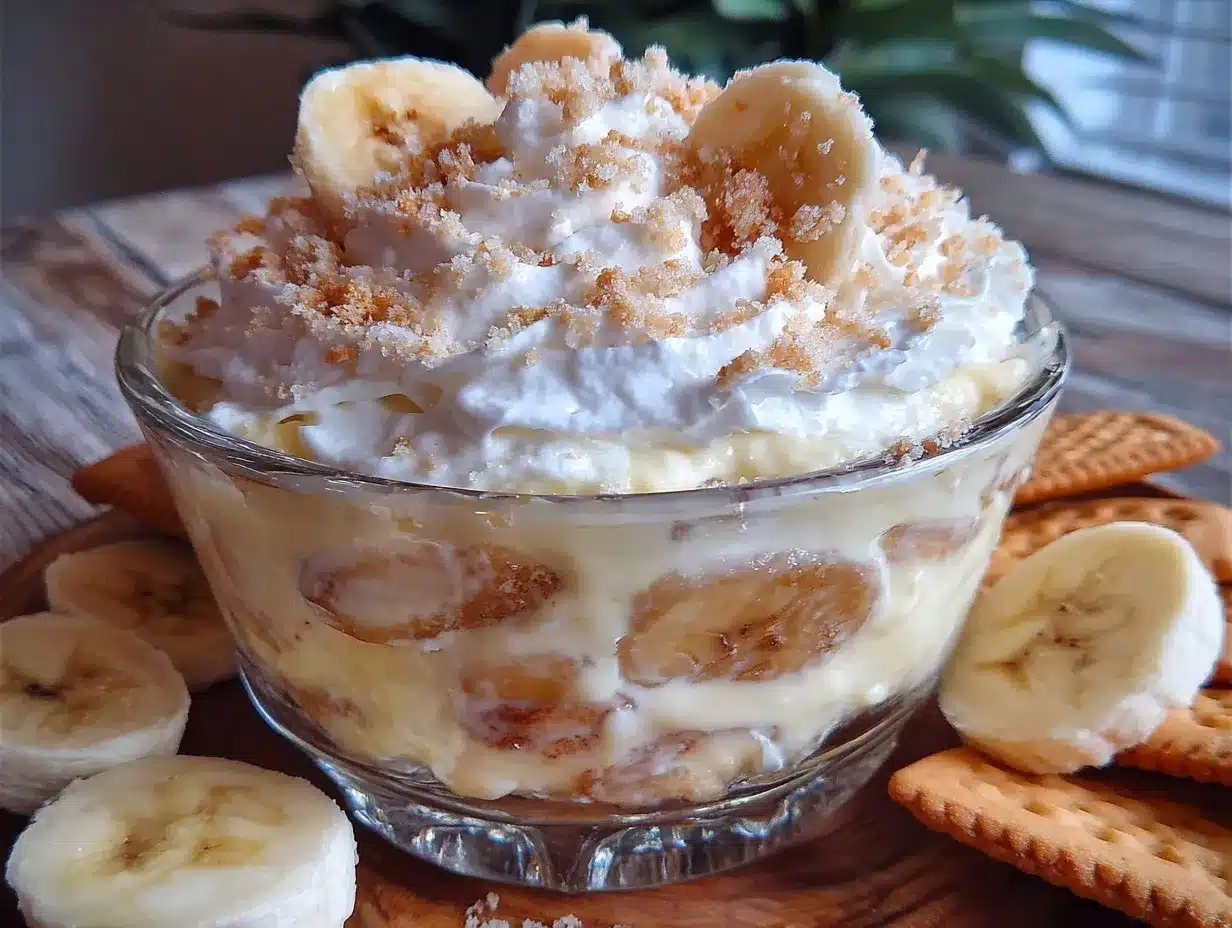
Let me tell you, the scent of ripe bananas mingling with the sweet aroma of vanilla custard wafting from my kitchen is enough to make anyone’s mouth water instantly. The first time I made this creamy banana pudding recipe, it was a rainy Sunday afternoon—perfect for cozying up with a comforting treat. I was instantly hooked, the kind of moment where you pause, take a deep breath, and just smile because you know you’re onto something truly special. It brought back memories of summer family reunions when I was knee-high to a grasshopper, sitting at Grandma’s kitchen table, savoring her famous banana pudding that felt like a warm hug in every spoonful.
Honestly, I wish I had discovered this dreamy dessert recipe years ago. It’s dangerously easy yet delivers pure, nostalgic comfort that’s hard to beat. My family couldn’t stop sneaking spoonfuls off the cooling dish (and I can’t really blame them). Whether you’re looking to brighten up a potluck, whip up a sweet treat for your kids after school, or simply indulge yourself on a quiet evening, this creamy banana pudding recipe is going to become your new go-to. I’ve tested it multiple times in the name of research, of course, and it’s now a staple for family gatherings and gifting alike. You’re going to want to bookmark this one.
Why You’ll Love This Creamy Banana Pudding Recipe
This creamy banana pudding recipe isn’t just another dessert; it’s the kind of recipe that gets better every time you make it. Backed by plenty of kitchen trials and family feedback, here’s why it’s a winner:
- Quick & Easy: Comes together in under 30 minutes, perfect for those busy weeknights or last-minute dessert cravings.
- Simple Ingredients: No fancy grocery runs needed; you probably have everything sitting in your pantry or fridge right now.
- Perfect for Any Occasion: Whether it’s a casual weekend treat or a show-stopper at potlucks and holiday dinners, this pudding fits the bill.
- Crowd-Pleaser: Kids and adults alike rave about its creamy texture and sweet banana flavor—always disappears fast!
- Unbelievably Delicious: The marriage of silky vanilla custard with fresh bananas and crunchy vanilla wafers creates a next-level comfort food experience.
What really makes this creamy banana pudding recipe stand apart is the silky smoothness of the homemade custard, which beats the usual instant mixes hands down. I blend the custard just right to get that perfect creamy consistency without being too thick or runny. Plus, the layering technique—alternating custard, ripe bananas, and vanilla wafers—creates a dreamy texture contrast that’s honestly addictive. This isn’t just dessert; it’s a little moment of joy on a plate that makes you close your eyes after the very first bite. Whether you’re impressing guests without stress or turning a simple meal into something memorable, this pudding delivers.
What Ingredients You Will Need
This creamy banana pudding recipe uses simple, wholesome ingredients that come together to deliver bold flavor and a satisfying texture without any fuss. Most are pantry staples or easy to find at any grocery store:
- Ripe Bananas: 4 medium bananas, sliced (the star of the show—you want them ripe but still firm)
- Whole Milk: 2 ½ cups (for that rich, creamy custard base; you can swap with almond or oat milk if needed)
- Granulated Sugar: ¾ cup (balances sweetness perfectly without overpowering)
- Large Egg Yolks: 3, room temperature (adds richness and creates that smooth custard texture)
- All-Purpose Flour: 3 tablespoons (helps thicken the pudding gently)
- Salt: A pinch (to bring out flavors)
- Vanilla Extract: 2 teaspoons (I recommend Nielsen-Massey for the best flavor)
- Unsalted Butter: 2 tablespoons, softened (adds silkiness and depth)
- Vanilla Wafers: About 45 wafers (for layering and that classic crunch; Nilla Wafers are my go-to)
- Heavy Whipping Cream: 1 cup (whipped to soft peaks for topping; optional but highly recommended for extra creaminess)
Feel free to swap the all-purpose flour with cornstarch for a gluten-free version, and if you want a lighter pudding, use 2% milk—but keep the butter for that luscious mouthfeel. For seasonal twists, adding fresh berries or toasted coconut on top makes it feel extra special.
Equipment Needed
- Medium Saucepan: For cooking the custard (a heavy-bottomed pan works best to prevent scorching)
- Mixing Bowls: At least two—one for custard prep and one for whipping cream
- Whisk: Essential for smooth custard and whipping cream, I prefer a balloon whisk for better aeration
- Measuring Cups and Spoons: Precise measurements make all the difference in pudding texture
- Rubber Spatula: For folding ingredients gently without deflating the whipped cream
- 9×13-inch Baking Dish or Trifle Bowl: Ideal for layering pudding, bananas, and wafers
- Hand Mixer or Stand Mixer: For whipping cream quickly and easily (a whisk works but takes longer)
If you don’t have a stand mixer, no worries—just give your arm a workout with a good whisk! A non-stick saucepan is also a good idea to make clean-up easier. Investing in a quality whisk and spatula will pay off for many recipes ahead.
Preparation Method
- Prep the Bananas: Peel and slice 4 medium ripe bananas into ¼-inch thick rounds. Set aside. (Tip: Slice just before assembling to prevent browning.) – ~5 minutes
- Make the Custard Base: In a medium saucepan, whisk together ¾ cup granulated sugar, 3 tablespoons all-purpose flour, and a pinch of salt. Slowly whisk in 2 ½ cups whole milk until smooth. – ~3 minutes
- Cook the Custard: Place saucepan over medium heat and cook, stirring constantly, until mixture thickens and just begins to bubble (about 7-9 minutes). Be patient here—constant whisking prevents lumps and scorching. – ~9 minutes
- Temper the Egg Yolks: In a small bowl, whisk 3 large egg yolks. Slowly pour about ½ cup of the hot custard into yolks, whisking rapidly to avoid scrambling. Then, pour yolk mixture back into saucepan. – ~5 minutes
- Finish Cooking Custard: Return saucepan to medium heat and cook, stirring, until custard thickens further and coats the back of a spoon (about 2-3 minutes). Remove from heat. – ~3 minutes
- Add Butter and Vanilla: Stir in 2 tablespoons softened unsalted butter and 2 teaspoons vanilla extract until fully melted and combined. Set custard aside to cool slightly. – ~2 minutes
- Whip the Cream: In a chilled bowl, whip 1 cup heavy cream until soft peaks form. (If you don’t have heavy cream, lightly whipped cream cheese or mascarpone can work as a richer alternative.) – ~5 minutes
- Fold Whipped Cream into Custard: When custard is lukewarm, gently fold in whipped cream using a rubber spatula to keep it light and airy. Avoid overmixing. – ~3 minutes
- Assemble the Pudding: In a 9×13-inch dish, layer vanilla wafers evenly on the bottom. Add a layer of sliced bananas, then spread a layer of custard over. Repeat layers until all ingredients are used, finishing with a custard layer on top. – ~10 minutes
- Chill: Cover with plastic wrap (press wrap directly onto pudding surface to prevent skin) and refrigerate for at least 4 hours, ideally overnight. This allows flavors to meld and wafers to soften perfectly. – ~4+ hours
- Serve: Before serving, top with extra whipped cream and garnish with a few vanilla wafers or banana slices for a pretty presentation. – ~5 minutes
Pro tip: If your custard gets too thick or lumps form, a quick whisk with a splash of milk can smooth it right back out before folding in the whipped cream. Also, be sure to cool custard before adding whipped cream to avoid deflating it.
Cooking Tips & Techniques
Making creamy banana pudding that’s just right takes a few tricks I’ve picked up after some trial and error. First off, patience is key when cooking the custard. Stir constantly but gently to prevent burning or lumps. If you rush the process or heat too high, you’ll end up with scrambled eggs or grainy texture. Also, tempering the egg yolks by slowly adding hot custard prevents curdling—don’t skip this step!
When whipping the cream, chill your bowl and beaters for a cooler, fluffier result. Stop when you see soft peaks to avoid overwhipping, which can turn into butter (and nobody wants that). Folding whipped cream into custard is another step requiring a light touch—fold gently to keep the pudding airy and dreamy.
Layering is where the magic happens. You want enough wafers to add crunch but not so many they overwhelm the creamy layers. The bananas should be ripe but firm so they hold shape and don’t turn mushy. Finally, refrigerate long enough to let the flavors marry and wafers soften slightly, creating that melt-in-your-mouth texture that’s irresistible.
Variations & Adaptations
- Chocolate Banana Pudding: Add a layer of chocolate pudding or sprinkle cocoa powder between layers for a chocolaty twist.
- Vegan Version: Swap whole milk for coconut or almond milk, use cornstarch instead of egg yolks for thickening, and replace butter with coconut oil. Use vegan vanilla wafers and coconut whipped cream.
- Gluten-Free: Use gluten-free vanilla wafers or substitute with crushed gluten-free cookies or graham crackers.
- Seasonal Fruit Mix: Swap some bananas with sliced strawberries or blueberries in summer for a fresh burst of flavor.
- Spiced Banana Pudding: Add a pinch of cinnamon or nutmeg to the custard for a cozy, warm flavor profile.
Personally, I’ve tried adding a splash of bourbon to the custard for an adult-friendly version, which brings a lovely depth without overpowering the banana’s sweetness. Feel free to tweak and make this pudding your own!
Serving & Storage Suggestions
This creamy banana pudding is best served chilled, straight from the fridge, so the custard is cool and the wafer layers are perfectly softened. For a pretty presentation, spoon into individual dessert glasses or a trifle bowl, topping with a dollop of whipped cream and a few banana slices or wafer crumbs.
Pair it with a strong cup of coffee or a light dessert wine for a delightful finish to any meal. It also makes a great sweet treat for brunch or a picnic.
Store leftovers covered tightly in the refrigerator for up to 3 days. The flavors actually deepen with time, but the bananas may start to brown, so eat within that window. You can freeze banana pudding, but the texture changes—custard may separate slightly upon thawing, so I recommend enjoying fresh whenever possible.
To reheat, gently warm a small portion in the microwave for 15-20 seconds if you prefer it slightly warm, but honestly, this pudding shines when cool and creamy.
Nutritional Information & Benefits
Each serving of this creamy banana pudding (about 1 cup) contains roughly 250-300 calories, with moderate fat and sugar content. Thanks to the fresh bananas, you get a good dose of potassium, vitamin C, and dietary fiber, which help support heart health and digestion. The homemade custard uses whole eggs and milk, providing protein and calcium.
If you’re watching your carb intake, swapping sugar for a natural sweetener like monk fruit or stevia can reduce the sugar load without compromising taste. Also, choosing almond or oat milk can make this recipe dairy-free and lower in calories.
This dessert isn’t just indulgent; it offers some nutritional perks when made with quality ingredients and enjoyed in moderation. It’s a sweet way to treat yourself and your family while sneaking in some fruit goodness.
Conclusion
This creamy banana pudding recipe truly is a dreamy dessert experience worth making again and again. It’s simple enough for a weeknight treat yet impressive enough to share at family gatherings or potlucks. What I love most is how customizable it is—you can tweak the ingredients or layering to suit your taste and dietary needs.
Honestly, it feels like a little bowl of happiness that brings people together. So go ahead, try this recipe, and don’t be shy about making it your own. I’d love to hear how you customize it or any memories it brings up for you. Please drop a comment below or share your adaptations—sharing recipes is half the fun!
Now, grab those bananas and start whipping up some creamy magic. You won’t regret it!
FAQs About This Creamy Banana Pudding Recipe
Can I make this banana pudding ahead of time?
Absolutely! In fact, chilling it overnight allows the flavors to meld beautifully and the wafers to soften perfectly. Just cover tightly and refrigerate.
What’s the best way to prevent bananas from browning in the pudding?
Slicing bananas just before assembling helps, and layering them between custard layers shields them from air. You can also brush slices lightly with lemon juice.
Can I use instant pudding mix instead of homemade custard?
You can, but the homemade custard makes a richer, smoother pudding that tastes fresher and less artificial. It’s worth the little extra effort!
How do I store leftover banana pudding?
Keep leftovers covered in the fridge for up to 3 days. It’s best enjoyed cold and fresh for the best texture and flavor.
Is this banana pudding recipe gluten-free?
Not as-is, since vanilla wafers contain gluten. However, you can use gluten-free wafers or crushed gluten-free cookies to make it safe for gluten-sensitive friends.
Pin This Recipe!

Creamy Banana Pudding Recipe Easy Homemade Dessert for Family

A nostalgic and creamy banana pudding made with homemade vanilla custard, ripe bananas, and crunchy vanilla wafers. Perfect for family gatherings, potlucks, or a cozy treat.
- Prep Time: 15 minutes
- Cook Time: 15 minutes
- Total Time: 4 hours 30 minutes
- Yield: 8 servings 1x
- Category: Dessert
- Cuisine: American
Ingredients
- 4 medium ripe bananas, sliced into 1/4-inch thick rounds
- 2 1/2 cups whole milk (can substitute almond or oat milk)
- 3/4 cup granulated sugar
- 3 large egg yolks, room temperature
- 3 tablespoons all-purpose flour (can substitute cornstarch for gluten-free)
- A pinch of salt
- 2 teaspoons vanilla extract
- 2 tablespoons unsalted butter, softened
- About 45 vanilla wafers
- 1 cup heavy whipping cream, whipped to soft peaks (optional but recommended)
Instructions
- Peel and slice 4 medium ripe bananas into 1/4-inch thick rounds. Set aside.
- In a medium saucepan, whisk together 3/4 cup granulated sugar, 3 tablespoons all-purpose flour, and a pinch of salt. Slowly whisk in 2 1/2 cups whole milk until smooth.
- Place saucepan over medium heat and cook, stirring constantly, until mixture thickens and just begins to bubble, about 7-9 minutes.
- In a small bowl, whisk 3 large egg yolks. Slowly pour about 1/2 cup of the hot custard into yolks, whisking rapidly to avoid scrambling. Then pour yolk mixture back into saucepan.
- Return saucepan to medium heat and cook, stirring, until custard thickens further and coats the back of a spoon, about 2-3 minutes. Remove from heat.
- Stir in 2 tablespoons softened unsalted butter and 2 teaspoons vanilla extract until fully melted and combined. Set custard aside to cool slightly.
- In a chilled bowl, whip 1 cup heavy cream until soft peaks form.
- When custard is lukewarm, gently fold in whipped cream using a rubber spatula to keep it light and airy. Avoid overmixing.
- In a 9×13-inch dish, layer vanilla wafers evenly on the bottom. Add a layer of sliced bananas, then spread a layer of custard over. Repeat layers until all ingredients are used, finishing with a custard layer on top.
- Cover with plastic wrap pressed directly onto pudding surface to prevent skin and refrigerate for at least 4 hours, ideally overnight.
- Before serving, top with extra whipped cream and garnish with a few vanilla wafers or banana slices.
Notes
Slice bananas just before assembling to prevent browning. Temper egg yolks slowly to avoid curdling. Chill bowl and beaters before whipping cream for best results. Fold whipped cream gently to keep pudding airy. Refrigerate at least 4 hours or overnight for best texture. Use gluten-free wafers for gluten-free version. Variations include adding chocolate pudding, spices, or seasonal fruits.
Nutrition
- Serving Size: About 1 cup
- Calories: 275
- Sugar: 22
- Sodium: 150
- Fat: 14
- Saturated Fat: 8
- Carbohydrates: 33
- Fiber: 2
- Protein: 5
Keywords: banana pudding, creamy dessert, homemade pudding, vanilla custard, easy dessert, family dessert, potluck dessert