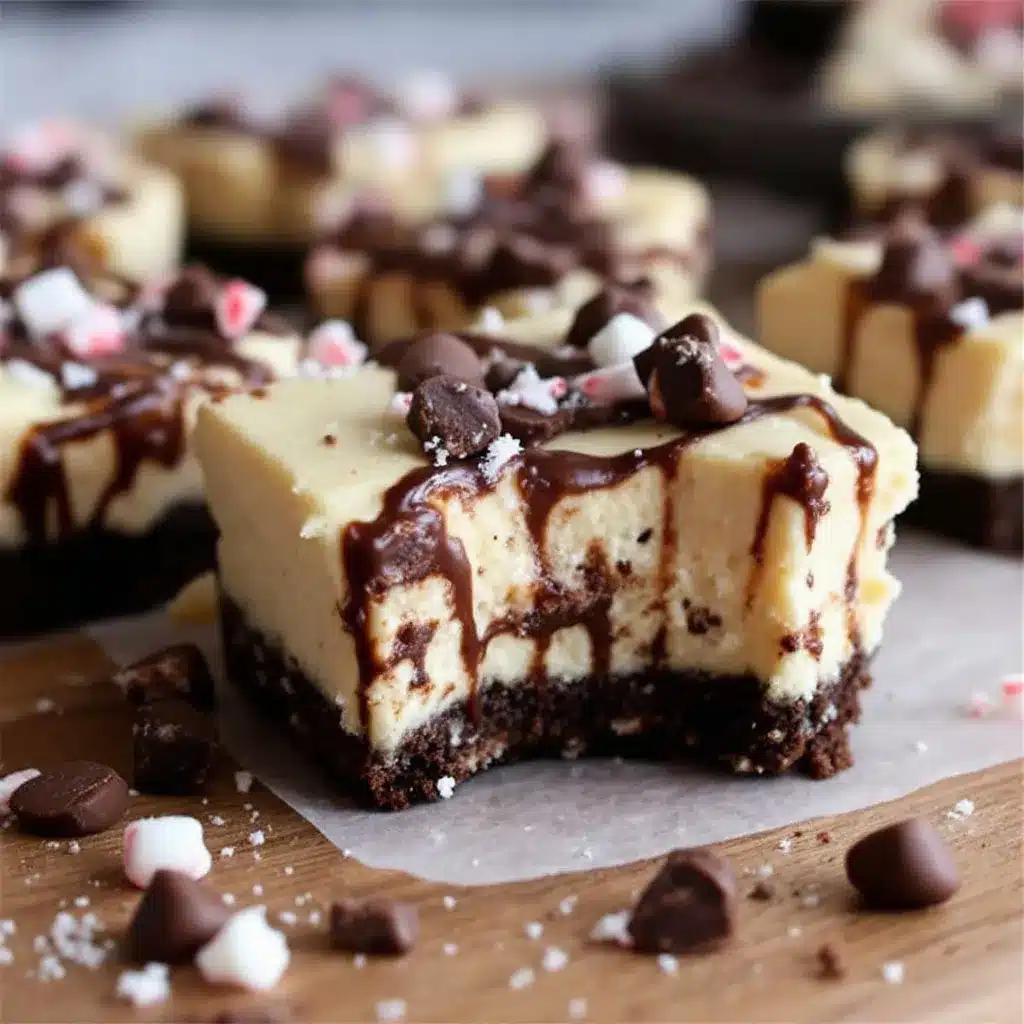
The snap is what matters most. Not the minty chill, not the sugary crunch, but that sharp, audible crack when the chocolate coating gives way. It’s a sound you feel in your teeth before you even taste the cream. I made these creamy peppermint bark cheesecake bites for a winter gathering, and honestly, the room went quiet when I pulled them out. Everyone stopped talking. They just stared at the jagged pieces of dark chocolate and white confection sitting on the platter.
I remember standing in my kitchen, watching the light hit the glossy shards of bark. It looked like stained glass made of dessert. I wasn’t thinking about flavor profiles or complex techniques. I was thinking about that first bite. You know that feeling when you break a piece of peppermint bark off a candy cane? That specific resistance followed by immediate release? That is the goal. The cheesecake inside is just the vehicle to get you there.
People expect a soft, cakey bite. So when they get something firm, cool, and coated in thick chocolate, it surprises them. It changes the texture of the entire experience. You aren’t eating a dessert; you’re breaking it. And that act of breaking it makes you pay attention to what you’re putting in your mouth. It slows you down.
I’ve tried making cheesecake in springform pans for years. It’s messy. The water bath is a hassle, and the cracks are inevitable if you breathe on it wrong. These bites? No cracks. No water baths. Just smooth, dense cream cheese folded with heavy cream and topped with the kind of chocolate that snaps like a twig. It’s the texture obsession that keeps me coming back to this recipe. Everything else is secondary.
Why You’ll Love This Recipe
Let’s be honest, making a traditional cheesecake can feel like a full-time job. You need a water bath, a springform pan that might leak, and hours of chilling time. This creamy peppermint bark cheesecake bites recipe cuts out all that stress. I tested this version about ten times before I wrote it down. I wanted the richness of a New York-style cheesecake but the portability of a truffle. The result is something that feels indulgent but is actually quite manageable to make.
- Quick & Easy: You can have these ready to eat in under an hour if you rush the chilling, but an hour of prep time is all it takes. No baking required, which means no oven heat and no messy kitchen.
- Simple Ingredients: You likely have cream cheese, heavy cream, sugar, and peppermint extract in your kitchen right now. The chocolate topping uses standard baking bars, not fancy couverture. It’s accessible comfort food.
- Perfect for Holidays: These are small, festive, and look incredible on a holiday platter. They fit the theme of peppermint bark perfectly without being as cliché as a candy cane cookie.
- Crowd-Pleaser: Kids love the minty chocolate flavor, and adults appreciate the less-sweet, denser texture compared to regular cheesecake. It bridges the gap between a snack and a dessert.
- Unbelievably Delicious: The contrast between the cold, creamy center and the room-temperature or slightly melted chocolate shell is next-level. It’s comfort food reimagined for the colder months.
What makes this recipe different is the use of a no-bake setting method combined with a thick chocolate bark coating. Most no-bake cheesecakes rely on gelatin or just whipped cream, which can be airy and light. Here, we use a higher ratio of cream cheese to cream, giving it a density that holds up to the heavy chocolate. It’s not just another version; it’s the version that actually tastes like the bark you buy at the store, but better because it’s fresh.
What Ingredients You Will Need
This recipe relies on high-quality dairy and simple pantry staples to create a rich, stable filling. Since there is no baking, the quality of the cream cheese will define the final taste. Avoid the tub-style whipped cream cheese; you need the block kind for the proper structure.
- Cream Cheese: Two 8-ounce blocks of full-fat cream cheese, softened to room temperature. This is the base. If it’s too cold, you’ll get lumps. If it’s too warm, the filling won’t set. I recommend Philadelphia brand for consistency, but any quality block brand works.
- Heavy Whipping Cream: One cup of cold heavy cream. This provides the volume and the silky mouthfeel. Make sure it’s very cold before whipping.
- Granulated Sugar: Half a cup of white sugar. This balances the tartness of the cheese. You can use powdered sugar for a smoother texture, but granulated works fine if you whip it well.
- Peppermint Extract: One to two teaspoons of pure peppermint extract. Avoid artificial candy cane flavoring if you can help it; it can taste chemical. Pure extract gives a clean, sharp mint flavor.
- Vanilla Extract: One teaspoon of vanilla. This rounds out the mint flavor so it doesn’t taste like toothpaste.
- Dark Chocolate Chips: One cup of semi-sweet or dark chocolate chips for the base layer. This adds a slight bitterness to counter the sweet mint.
- White Chocolate Chips: One cup of white chocolate chips for the top layer. Look for chips with a high cocoa butter content for a better snap.
- Crushed Peppermint Candies: Half a cup of crushed hard peppermint candies. These go into the white chocolate layer for that classic bark texture.
If you need a dairy-free option, you can swap the cream cheese for a vegan alternative like Forager Project cashew cream, though the texture will be slightly softer. The chocolate can also be swapped for dairy-free chocolate bars. For the crushed candies, you can use crushed candy canes or even crushed peppermint bark pieces if you want to double down on the flavor.
Equipment Needed
You don’t need much fancy gear for this. A stand mixer or a hand mixer is essential for getting the cream cheese smooth and the whipped cream to stiff peaks. If you don’t have a mixer, you can do this by hand, but it will take about ten minutes of arm work.
A 9×13 inch baking pan is the easiest way to make this. It allows you to chill the entire slab at once and then cut it into squares. Alternatively, you can use a standard muffin tin lined with cupcake liners for individual bites, though the cutting method is faster for cleanup.
You’ll also need a microwave-safe bowl for melting the chocolate. A silicone spatula is helpful for scraping the sides of the mixing bowl. For the chocolate layers, parchment paper or a silicone baking mat is useful to keep things clean, though not strictly necessary if you are cutting the final product anyway.
Preparation Method
- Prepare the Pan: Line a 9×13 inch baking pan with parchment paper, leaving an overhang on the long sides. This acts as a sling so you can lift the entire cheesecake slab out once it’s set. It makes cutting and cleaning so much easier. (Time: 2 minutes)
- Whip the Cream: In a large bowl, pour the cold heavy whipping cream. Beat on high speed until stiff peaks form. This means when you lift the beaters, the cream stands up straight without drooping. Be careful not to over-whip it into butter. Set this aside in the fridge. (Time: 3 minutes)
- Beat the Cheese: In a separate large bowl, add the softened cream cheese and sugar. Beat on medium-high speed until completely smooth and creamy. Scrape down the sides of the bowl. This step is crucial for avoiding lumps in the final bites. (Time: 4 minutes)
- Add Flavorings: Add the peppermint extract and vanilla extract to the cream cheese mixture. Beat on low speed just until combined. You want the flavor distributed evenly without incorporating too much air. (Time: 1 minute)
- Fold Together: Gently fold the whipped cream into the cream cheese mixture using a spatula. Do this in two additions. Fold slowly and deliberately until no white streaks remain. You want to keep the air in the whipped cream to maintain the light texture. (Time: 3 minutes)
- Spread the Base: Pour the cheesecake mixture into the prepared pan. Use an offset spatula or the back of a spoon to spread it evenly into the corners. Smooth the top as much as possible. (Time: 2 minutes)
- Chill: Place the pan in the refrigerator for at least 30 minutes. This firms up the cream cheese base so the chocolate layer doesn’t sink in or mix with it. (Time: 30 minutes)
- Melt the Chocolate: While the cheesecake chills, melt the dark chocolate chips in a microwave-safe bowl. Heat in 30-second intervals, stirring between each, until smooth. If it looks too thick, add a teaspoon of coconut oil or heavy cream to thin it out. (Time: 2 minutes)
- Add Dark Layer: Pour the melted dark chocolate over the chilled cheesecake. Spread it evenly to cover the entire surface. Immediately sprinkle a light layer of crushed peppermint candies over the dark chocolate if you like, or save them for the top. (Time: 2 minutes)
- Chill Again: Return the pan to the fridge for another 15 minutes to let the dark chocolate set. (Time: 15 minutes)
- Melt White Chocolate: Melt the white chocolate chips using the same microwave method. Stir until smooth. (Time: 2 minutes)
- Add White Layer: Pour the melted white chocolate over the set dark chocolate layer. Spread evenly. Immediately sprinkle the remaining crushed peppermint candies on top. Press them down gently so they stick. (Time: 2 minutes)
- Final Set: Refrigerate for at least 1 hour, or until the top chocolate layer is completely hard. (Time: 1 hour)
- Cut: Lift the slab out of the pan using the parchment sling. Place it on a cutting board. Use a sharp knife to cut into squares or rectangles. Wipe the knife clean between cuts for clean edges. (Time: 5 minutes)
Cooking Tips & Techniques
The biggest mistake people make with no-bake cheesecake is using warm cream cheese. If your cream cheese is still cold from the fridge, it will remain lumpy even after whipping. Take it out at least an hour before you start. Room temperature cream cheese whips into a silky emulsion that feels like frosting.
Another tip is to keep your heavy cream cold. If the cream warms up while you are working, it won’t whip properly. Chill your mixing bowl in the freezer for 15 minutes before starting if your kitchen is warm. This helps the cream hold its structure.
When melting chocolate, never microwave it on high power. Chocolate burns easily and becomes grainy if it gets too hot. Low power in short bursts is the only way to go. If you add liquid to chocolate, do it sparingly. Too much liquid can cause the chocolate to seize and turn into a solid lump.
For the best snap, make sure your chocolate layers are thin but even. A layer that is too thick will be hard to bite through. A layer that is too thin will break apart when you cut the bites. Aim for about 1/8 inch thickness for each chocolate layer.
Variations & Adaptations
While the classic peppermint and chocolate combo is unbeatable, you can tweak this recipe to suit different tastes. For a mint chocolate chip variation, fold mini chocolate chips directly into the cheesecake filling before spreading it in the pan. This adds texture and bursts of chocolate in every bite.
If you want a less sweet option, use 70% dark chocolate for the top layer and reduce the sugar in the filling to a quarter cup. The tartness of the cheese will balance the bitterness of the dark chocolate beautifully. This is great for those who find standard desserts too sugary.
For a holiday twist, you can swap the peppermint extract for orange extract. Orange and chocolate is a classic combination that feels festive without being strictly minty. You can still use crushed candy canes on top for the red and white color, or use crushed pistachios for a green and red look.
Gluten-free? This recipe is naturally gluten-free as long as your chocolate chips and peppermint candies are certified gluten-free. Cross-contamination can happen in factories, so check the labels if you have celiac disease. It’s a safe treat for most gluten-sensitive folks.
Serving & Storage Suggestions
These bites are best served chilled. The cold temperature keeps the chocolate firm and the cheesecake creamy. If they get too warm, the layers will start to separate and the chocolate will melt onto your fingers. Keep them in the fridge until the moment you are ready to eat.
Store them in an airtight container in the refrigerator for up to one week. Layer them with parchment paper if you stack them to prevent the chocolate from sticking together. They also freeze well for up to three months. Thaw them in the fridge overnight before serving.
For a fancy presentation, garnish each bite with a small sprig of fresh mint or a dusting of cocoa powder. They pair well with a hot cup of coffee or tea, which cuts through the richness of the chocolate and cheese.
Nutritional Information & Benefits
These bites are rich in calories due to the cream cheese and chocolate, but they are also a source of protein from the dairy. A typical bite contains about 150-200 calories. They are not a health food, but they are a controlled indulgence.
The peppermint in the extract can aid in digestion and soothe an upset stomach, which is a nice bonus after a heavy meal. The dark chocolate layer provides antioxidants if you use a high-cocoa percentage. Just be mindful of portion sizes, as these are dense and satisfying.
Conclusion
Making creamy peppermint bark cheesecake bites is a fun way to bring the flavors of the holidays into your kitchen without the stress of baking. The texture is everything here—the snap of the chocolate, the creaminess of the filling, and the crunch of the candy. It’s a dessert that feels special but is easy to make.
I hope you try this recipe and enjoy the process. Don’t be afraid to experiment with the chocolate ratios or the type of peppermint candies you use. Make it your own. And if you do, I’d love to hear how it turned out. Leave a comment below or share a photo on social media. Happy baking!
Frequently Asked Questions
Can I use a muffin tin instead of a 9×13 pan?
Yes, you can. Line a muffin tin with cupcake liners. Fill each liner about three-quarters full with the cheesecake mixture. Chill for 30 minutes, then add the chocolate layers. This makes individual portions that are easy to grab and go.
Why is my chocolate layer not setting?
This usually happens if the chocolate was too thin or if the kitchen is too warm. Make sure you don’t add too much oil or cream to the chocolate. Also, ensure the pan is in the coldest part of your fridge while the chocolate sets.
Can I make these ahead of time?
Absolutely. In fact, they taste better the next day as the flavors meld together. You can make them up to a week in advance. Just keep them covered in the fridge.
What if I don’t have peppermint extract?
You can use peppermint oil, but be careful as it is much stronger. Start with half a teaspoon. Alternatively, you can skip the mint and use vanilla or almond extract for a different flavor profile.
Do I need to use dark and white chocolate?
Not strictly. You can use all dark chocolate or all white chocolate. However, the two-tone look is iconic for peppermint bark and adds visual appeal. You can also use milk chocolate if you prefer a sweeter taste.
Pin This Recipe!
Creamy Peppermint Bark Cheesecake Bites
A no-bake holiday dessert featuring a dense, creamy peppermint cheesecake filling topped with layers of dark and white chocolate and crushed peppermint candies. These bites offer the satisfying snap of traditional peppermint bark with the rich texture of New York-style cheesecake.
- Prep Time: 15 minutes
- Cook Time: 0 minutes
- Total Time: 1 hour 15 minutes
- Yield: 24 servings 1x
- Category: Dessert
- Cuisine: American
Ingredients
- 2 blocks (16 oz total) full-fat cream cheese, softened to room temperature
- 1 cup cold heavy whipping cream
- 1/2 cup granulated sugar
- 1–2 teaspoons pure peppermint extract
- 1 teaspoon vanilla extract
- 1 cup semi-sweet or dark chocolate chips
- 1 cup white chocolate chips
- 1/2 cup crushed hard peppermint candies
Instructions
- Line a 9×13 inch baking pan with parchment paper, leaving an overhang on the long sides to act as a sling for easy removal.
- In a large bowl, whip the cold heavy cream on high speed until stiff peaks form. Set aside in the refrigerator.
- In a separate large bowl, beat the softened cream cheese and sugar on medium-high speed until completely smooth and creamy.
- Add the peppermint extract and vanilla extract to the cream cheese mixture and beat on low speed just until combined.
- Gently fold the whipped cream into the cream cheese mixture in two additions using a spatula until no white streaks remain.
- Spread the cheesecake mixture evenly into the prepared pan.
- Chill the pan in the refrigerator for at least 30 minutes to firm up the base.
- While chilling, melt the dark chocolate chips in a microwave-safe bowl in 30-second intervals, stirring between each, until smooth.
- Pour the melted dark chocolate over the chilled cheesecake and spread evenly. Optionally sprinkle some crushed peppermint candies here.
- Return the pan to the fridge for 15 minutes to let the dark chocolate set.
- Melt the white chocolate chips using the same microwave method until smooth.
- Pour the melted white chocolate over the set dark chocolate layer and spread evenly.
- Immediately sprinkle the remaining crushed peppermint candies on top and press gently to adhere.
- Refrigerate for at least 1 hour, or until the top chocolate layer is completely hard.
- Lift the slab out of the pan using the parchment sling and cut into squares or rectangles with a sharp knife.
Notes
Ensure cream cheese is at room temperature to avoid lumps. Keep heavy cream very cold to ensure it whips properly. Melt chocolate on low power in short bursts to prevent burning. For a dairy-free option, swap cream cheese for vegan alternatives like cashew cream and use dairy-free chocolate chips.
Nutrition
- Serving Size: 1 bite (approx. 1.5
- Calories: 175
- Sugar: 16
- Sodium: 45
- Fat: 12
- Saturated Fat: 7
- Carbohydrates: 18
- Fiber: 1
- Protein: 3
Keywords: peppermint bark, cheesecake bites, no-bake dessert, holiday treats, chocolate dessert, peppermint cheesecake, easy holiday recipe


