The last marshmallow got stuck to the wax paper. My three-year-old had powdered sugar on her nose, and my son was trying to convince me ghosts needed two eyes, not two dots. I was covered in butter, and honestly? I was having the best time I’d had all week.
That’s the thing about these Easy Halloween Rice Krispie Ghost Treats. They aren’t about perfection. They’re about the moment when your kid holds up a lopsided ghost and grins like they just won an award. I made them for a last-minute school party because I forgot (again) to sign up for the treat rotation. I had a box of cereal, a bag of marshmallows, and about twenty minutes before pickup. I figured I’d try something simple.
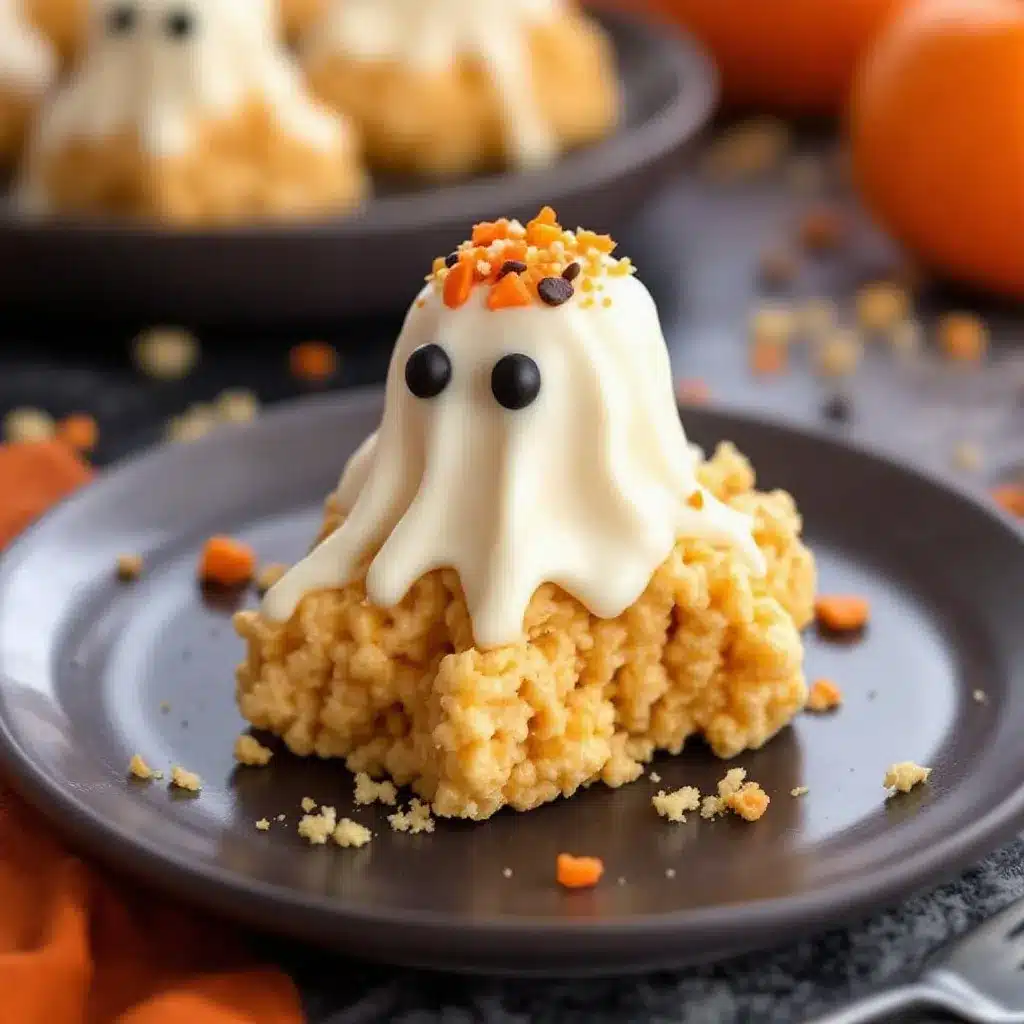
What I didn’t expect was how much they’d love it. The ghost shape made them laugh. The white chocolate drizzle felt fancy even though it was just melted chips. And the best part? Zero baking. No oven required. No melting butter in a hot kitchen while trying to supervise little hands. Just a microwave, a bowl, and a whole lot of sticky fun.
These Easy Halloween Rice Krispie Ghost Treats have become our go-to for Halloween parties, classroom snacks, and even movie nights when we want something festive without the fuss. They’re the kind of recipe that looks like you tried really hard, but between us? You didn’t. And that’s exactly the point.
Why You’ll Love This Recipe
I’ve tested a lot of Halloween desserts over the years. Some are too complicated. Some require specialty ingredients you’ll never use again. And some just don’t taste good enough to justify the effort. These Easy Halloween Rice Krispie Ghost Treats hit the sweet spot every time.
- Quick & Easy: From start to finish, you’re looking at about 20 minutes. That includes shaping the ghosts. No oven, no complicated steps, no stress.
- Simple Ingredients: You probably already have everything in your pantry. Rice Krispies cereal, marshmallows, butter, white chocolate chips, and candy eyes. That’s it.
- Perfect for Halloween: Whether it’s a classroom party, a trunk-or-treat event, or just a fun weekend activity, these ghosts fit right in. They’re festive without being scary.
- Crowd-Pleaser: Kids love them. Adults love them. Even picky eaters go for these because, let’s face it, it’s basically a marshmallow treat dressed up for a party.
- Unbelievably Delicious: The combination of crispy cereal, gooey marshmallow, and creamy white chocolate is next-level comfort food. You’ll eat three before you realize it.
What makes these different from every other Halloween dessert? It’s the texture. The white chocolate adds a slight snap on the outside while the inside stays soft and chewy. Plus, the ghost shape is just fun. It’s not another cupcake or cookie. It’s a ghost. And it’s delicious.
What Ingredients You Will Need
This recipe uses simple, pantry-friendly ingredients to deliver big flavor and even bigger fun. No fancy shopping trips required. Here’s what you’ll need:
For the Rice Krispie Treat Base
- 6 cups Rice Krispies cereal (or any crispy rice cereal; I prefer the name brand for consistent texture)
- 4 tablespoons unsalted butter (salted works too, just skip the extra salt; use dairy-free butter if needed)
- 10 oz marshmallows (one standard bag; mini marshmallows melt faster, but regular ones work fine)
- 1/4 teaspoon vanilla extract (optional but adds a nice warmth; I never skip it)
- Pinch of salt (balances the sweetness; trust me on this one)
For the Ghost Decoration
- 1 cup white chocolate chips (I recommend Ghirardelli or Guittard for smooth melting; avoid cheap brands that seize up)
- 1 tablespoon coconut oil or vegetable shortening (helps the chocolate thin out for drizzling; optional but helpful)
- Candy eyes (the small round ones; you can find them at any craft store or online; about 24-30 pieces)
- Powdered sugar (for dusting; optional but adds a ghostly glow)
Substitution Notes
If you need a gluten-free version, most Rice Krispies are gluten-free, but check the label because some generic brands use malt flavoring. For a dairy-free option, use vegan butter and dairy-free white chocolate chips. If you can’t find candy eyes, just use mini chocolate chips or black icing dots. They’ll look a little different but still cute.
Equipment Needed
You don’t need a lot of fancy tools for these Easy Halloween Rice Krispie Ghost Treats. Here’s what I use:
- Large microwave-safe bowl (glass or ceramic works best; plastic can warp with hot marshmallow)
- Rubber spatula (the silicone kind that won’t melt; a wooden spoon works too but gets sticky fast)
- 9×13 inch baking dish (or any rectangular pan; line it with parchment paper for easy removal)
- Parchment paper or wax paper (essential for preventing sticking; don’t skip this!)
- Small round cookie cutter or biscuit cutter (about 2.5 inches wide; a drinking glass works in a pinch)
- Microwave-safe small bowl (for melting white chocolate)
- Piping bag or zip-top bag (for drizzling chocolate; a spoon works too but it’s messier)
- Cutting board or clean work surface (lightly greased with butter or cooking spray)
If you don’t have a round cookie cutter, just use a knife to cut the treats into squares and then shape them into ghost forms by hand. It takes a little longer but works perfectly. I’ve done both methods, and honestly, the hand-shaped ghosts have more character.
Preparation Method
Let me walk you through this step by step. I’ve made these Easy Halloween Rice Krispie Ghost Treats about a dozen times now, so I’ve learned a few tricks along the way.
Step 1: Prepare Your Workspace
Before you start, line your 9×13 baking dish with parchment paper. Leave some overhang on the sides so you can lift the whole block out later. Lightly grease the parchment with butter or cooking spray. Also, grease a cutting board or clean counter space where you’ll shape the ghosts. Trust me, this saves so much frustration later.
Step 2: Melt the Butter and Marshmallows
In your large microwave-safe bowl, add the 4 tablespoons of butter. Microwave for 30 seconds until melted. Add the entire 10 oz bag of marshmallows and stir to coat them in butter. Microwave in 30-second intervals, stirring between each, until the marshmallows are completely melted and smooth. This usually takes about 2-3 minutes total. Be careful not to overheat, or the mixture will become tough.
Step 3: Add Vanilla and Salt
Stir in the 1/4 teaspoon vanilla extract and a pinch of salt. The salt is crucial here—it cuts through the sweetness and makes the treats taste more balanced. You won’t taste saltiness, I promise.
Step 4: Mix in the Cereal
Add the 6 cups of Rice Krispies cereal to the marshmallow mixture. Fold gently with your rubber spatula until the cereal is evenly coated. Don’t overmix, or the cereal will crush and you’ll lose that satisfying crunch. Work quickly while the mixture is still warm and pliable.
Step 5: Press into the Pan
Transfer the mixture to your prepared baking dish. Lightly grease your hands or the spatula with butter or cooking spray, then press the mixture evenly into the pan. Don’t press too hard, or the treats will be dense. You want them thick but not compacted. Let them cool at room temperature for about 15-20 minutes until firm but still slightly warm.
Step 6: Cut into Ghost Shapes
Once the treats are set but still slightly warm (this is important—cold treats crack), lift the block out using the parchment paper. Place it on your greased cutting board. Use your round cookie cutter to cut out circles. You should get about 12-15 ghosts depending on the size of your cutter. If the cutter sticks, dip it in powdered sugar or spray it with cooking spray between cuts.
Step 7: Shape the Ghosts
This is where the magic happens. Take each round and gently pinch one side to create a “tail” shape, making the round look like a teardrop. That’s the bottom of your ghost. The rounded side becomes the head. Don’t worry about perfection—each ghost will have its own personality. Place the shaped ghosts on a parchment-lined baking sheet.
Step 8: Melt the White Chocolate
In a small microwave-safe bowl, combine 1 cup white chocolate chips with 1 tablespoon coconut oil. Microwave in 30-second intervals, stirring after each, until smooth and fully melted. The coconut oil helps the chocolate flow smoothly for drizzling.
Step 9: Decorate the Ghosts
Transfer the melted white chocolate to a piping bag or a zip-top bag with a tiny corner snipped off. Drizzle the chocolate over each ghost in a zigzag or squiggly pattern to create a “ghostly” look. While the chocolate is still wet, press two candy eyes onto each ghost. Let the chocolate set at room temperature for about 10-15 minutes, or pop them in the fridge for 5 minutes to speed things up.
Step 10: Optional Dusting
If you want an extra spooky touch, lightly dust the ghosts with powdered sugar using a fine-mesh sieve. This gives them a foggy, ethereal look that’s perfect for Halloween.
Cooking Tips & Techniques
I’ve made my share of mistakes with these Easy Halloween Rice Krispie Ghost Treats, so let me save you some trouble.
Don’t overheat the marshmallows. This is the number one mistake. If you microwave them too long, the mixture becomes hard and rubbery. You want it just melted and smooth. I stop as soon as I see no more solid marshmallow pieces.
Work while it’s warm. The marshmallow mixture sets quickly. Once you add the cereal, you have about 5-7 minutes before it becomes too stiff to shape. If it starts getting hard, pop the bowl in the microwave for 10 seconds to soften it up.
Grease everything. Your hands, your spatula, your cutting board, your cookie cutter. Marshmallow treats stick to everything. A light coating of butter or cooking spray makes all the difference.
Use fresh marshmallows. Stale marshmallows don’t melt as smoothly and can leave lumps. If your bag has been open for a while, it’s worth buying fresh ones.
Let the treats cool slightly before cutting. If you cut while they’re too warm, they’ll fall apart. Too cold, and they’ll crack. The sweet spot is about 15-20 minutes at room temperature.
I once tried to speed things up by putting the whole pan in the fridge. Big mistake. The treats got hard and brittle, and my ghosts looked like they’d been through a haunted house. Patience is your friend here.
Variations & Adaptations
One of the best things about these Easy Halloween Rice Krispie Ghost Treats is how easy they are to customize. Here are some variations I’ve tried and loved:
Gluten-Free Version
Most Rice Krispies are gluten-free, but double-check the label. For a certified gluten-free option, use Barbara’s Brown Rice Crisps or another gluten-free crispy rice cereal. Everything else in the recipe is naturally gluten-free.
Dairy-Free Version
Use vegan butter (I like Miyoko’s or Earth Balance) and dairy-free white chocolate chips. Enjoy Life makes a good dairy-free white chocolate option. The texture will be slightly different, but the taste is still fantastic.
Chocolate Ghosts
Instead of white chocolate, use dark or milk chocolate for drizzling. This gives the ghosts a spooky, gothic look. I did this for a Halloween party and they looked like shadow ghosts. Really cool.
Colorful Ghosts
Add a few drops of food coloring to the marshmallow mixture before adding the cereal. Purple, green, or orange ghosts are perfect for Halloween. Gel food coloring works best because it doesn’t add extra liquid.
Spooky Sprinkle Ghosts
Before the white chocolate sets, sprinkle on some Halloween-themed sprinkles. I’ve used orange and black jimmies, bat-shaped sprinkles, and even edible glitter. Kids go crazy for these.
Peanut Butter Ghosts
Stir in 1/4 cup of creamy peanut butter with the marshmallows for a nutty twist. This adds protein and a rich flavor that pairs beautifully with the white chocolate. Just make sure no one has peanut allergies if you’re serving these at a party.
Serving & Storage Suggestions
These Easy Halloween Rice Krispie Ghost Treats are best served at room temperature. The white chocolate should be set but not rock hard, and the marshmallow center should be soft and chewy.
For presentation, I like to arrange them on a black or orange platter. A dusting of powdered sugar on the plate adds to the spooky effect. If you’re serving them at a Halloween party, place them on a bed of black tissue paper or fake spiderwebs for extra drama.
These treats pair perfectly with warm apple cider, hot chocolate, or even a simple glass of milk. For an adult Halloween party, they go surprisingly well with a dark stout or a pumpkin ale.
Storage: Store the ghosts in an airtight container at room temperature for up to 5 days. Layer them between sheets of parchment paper to prevent sticking. Do not refrigerate them, as the marshmallow will become hard and the white chocolate may bloom (develop white streaks).
Freezing: You can freeze these treats for up to 3 months. Place them in a single layer on a baking sheet and freeze until solid, then transfer to a freezer-safe container or zip-top bag. Thaw at room temperature for about 30 minutes before serving. The texture will be slightly softer, but they’re still delicious.
I’ve found that the flavors actually meld together after a day or two. The marshmallow gets a little softer, and the white chocolate sets perfectly. If you can resist eating them all immediately, they’re even better the next day.
Nutritional Information & Benefits
Let’s be real—these are a treat, not a health food. But here’s the estimated nutritional info per ghost (based on 12 servings):
- Calories: 220
- Total Fat: 9g
- Saturated Fat: 5g
- Carbohydrates: 34g
- Sugar: 22g
- Protein: 2g
- Sodium: 130mg
While these aren’t exactly a health food, they do have a few redeeming qualities. The Rice Krispies cereal is fortified with iron and B vitamins. Marshmallows are low in fat (though high in sugar). And the white chocolate does contain some calcium from the milk solids.
If you’re looking for a slightly healthier version, try using a sugar-free marshmallow alternative or reduce the white chocolate drizzle. But honestly? Halloween is about indulgence. I say enjoy them as they are and balance it out with healthier choices the rest of the week.
Conclusion
These Easy Halloween Rice Krispie Ghost Treats have become a tradition in our house. They’re the recipe I pull out when I want to make something special without spending hours in the kitchen. They’re the treat my kids ask for by name, and the one that always gets compliments at parties.
What I love most about them is how they bring people together. There’s something about shaping little ghosts and adding those googly eyes that makes everyone smile. It’s impossible to be in a bad mood when you’re making ghost treats.
I’d love to hear how yours turn out. Did your kids help shape them? Did you try a fun variation? Drop a comment below and let me know. And if you’re looking for more Halloween inspiration, check out my color-changing galaxy lemonade or these crispy bacon-wrapped jalapeño poppers for a savory option. Happy Halloween, and happy snacking!
Frequently Asked Questions
Can I make these ahead of time?
Yes! These Easy Halloween Rice Krispie Ghost Treats can be made up to 3 days in advance. Store them in an airtight container at room temperature. Just don’t add the powdered sugar until right before serving, or it will absorb into the treats.
Why did my white chocolate seize up?
White chocolate is sensitive to heat and moisture. If it seizes (becomes grainy and thick), you probably overheated it or got a drop of water in the bowl. To prevent this, melt it slowly in 30-second intervals and stir well. Adding a teaspoon of coconut oil can help smooth it out if it starts to thicken.
Can I use a different cereal?
Absolutely. Cocoa Krispies make chocolate ghosts, Fruity Pebbles give a colorful twist, and even puffed rice cereal works in a pinch. Just keep the cereal-to-marshmallow ratio the same for the best texture.
How do I keep the ghosts from sticking together?
Layer them between sheets of parchment paper or wax paper in your storage container. If you’re stacking them, make sure the white chocolate is fully set before stacking. A light dusting of powdered sugar also helps prevent sticking.
Can I make these without a cookie cutter?
Definitely. If you don’t have a round cookie cutter, just press the mixture into the pan, let it cool, and cut it into squares. Then shape each square into a ghost by hand—pinch one corner to make the tail and round the opposite corner for the head. They’ll look more rustic but just as delicious.
Pin This Recipe!

Easy Halloween Ghost Rice Krispie Treats Recipe

These Easy Halloween Rice Krispie Ghost Treats are a quick, no-bake dessert perfect for Halloween parties, classroom snacks, or festive movie nights. Made with simple ingredients like Rice Krispies cereal, marshmallows, and white chocolate, they’re fun to make with kids and always a crowd-pleaser.
- Prep Time: 10 minutes
- Cook Time: 10 minutes
- Total Time: 20 minutes
- Yield: 12-15 servings 1x
- Category: Dessert
- Cuisine: American
Ingredients
- 6 cups Rice Krispies cereal
- 4 tablespoons unsalted butter
- 10 oz marshmallows (one standard bag)
- 1/4 teaspoon vanilla extract (optional)
- Pinch of salt
- 1 cup white chocolate chips
- 1 tablespoon coconut oil or vegetable shortening (optional)
- Candy eyes (about 24-30 pieces)
- Powdered sugar (for dusting, optional)
Instructions
- Line a 9×13 inch baking dish with parchment paper, leaving overhang on sides. Lightly grease the parchment and a cutting board with butter or cooking spray.
- In a large microwave-safe bowl, microwave 4 tablespoons butter for 30 seconds until melted. Add 10 oz marshmallows and stir to coat. Microwave in 30-second intervals, stirring between each, until completely melted and smooth (about 2-3 minutes total).
- Stir in 1/4 teaspoon vanilla extract and a pinch of salt.
- Add 6 cups Rice Krispies cereal and fold gently with a rubber spatula until evenly coated. Work quickly while mixture is warm.
- Transfer mixture to prepared baking dish. Lightly grease hands or spatula, then press mixture evenly into pan. Don’t press too hard. Let cool at room temperature for 15-20 minutes until firm but still slightly warm.
- Lift the block out using parchment paper and place on greased cutting board. Use a round cookie cutter (about 2.5 inches) to cut out circles. Dip cutter in powdered sugar or spray with cooking spray between cuts if it sticks.
- Shape each round into a ghost by gently pinching one side to create a teardrop shape (the tail). Place shaped ghosts on a parchment-lined baking sheet.
- In a small microwave-safe bowl, combine 1 cup white chocolate chips with 1 tablespoon coconut oil. Microwave in 30-second intervals, stirring after each, until smooth and fully melted.
- Transfer melted white chocolate to a piping bag or zip-top bag with a tiny corner snipped off. Drizzle over each ghost in a zigzag or squiggly pattern. While chocolate is still wet, press two candy eyes onto each ghost.
- Let chocolate set at room temperature for 10-15 minutes, or refrigerate for 5 minutes. Optionally, dust with powdered sugar using a fine-mesh sieve for a ghostly glow.
Notes
Don’t overheat the marshmallows or the mixture will become hard and rubbery. Work while the mixture is warm as it sets quickly. Grease everything (hands, spatula, cutting board, cookie cutter) to prevent sticking. Use fresh marshmallows for best melting. Let treats cool slightly before cutting—too warm and they fall apart, too cold and they crack. Store in an airtight container at room temperature for up to 5 days. Do not refrigerate. Can be frozen for up to 3 months.
Nutrition
- Serving Size: 1 ghost
- Calories: 220
- Sugar: 22
- Sodium: 130
- Fat: 9
- Saturated Fat: 5
- Carbohydrates: 34
- Protein: 2
Keywords: Halloween treats, Rice Krispie treats, ghost treats, no-bake dessert, easy Halloween recipe, kid-friendly dessert


